Insanitomeium Help
Everything in the app, explained — pick a topic from the menu.
Getting Started
After signing in, you land on the main workspace. If this is your first time, your binder is empty. Click the + button to create your first project and get started writing!
- Click the + button at the top of the binder (left sidebar) to create a new project. Type a title and press Enter.
- Click the ⊞ button to open the Project Manager, where you can rename, archive, delete, import, or export projects, and manage your labels and statuses.
- Switch between projects using the dropdown at the top of the binder.
- Every new project starts with a Story folder holding Chapter 1 and Scene 1, plus a Notes folder with a Characters folder (a ready-made character sheet) and a Research folder (a research sheet). Click Scene 1 and start typing.
- Backing up and moving projects — in the Project Manager, each project's menu has ↓ Export JSON, which saves the whole project (documents, labels, statuses) as one file. The ↑ Import button at the foot of the Project Manager turns that file back into a project. ↓ Export ZIP is for reading your work elsewhere and can't be imported back.
Planning a book before you write it? Start with Planning Sheets and Plot Outlines, then see the shape of the whole thing on the Plot Board and in the Outline.
The Top Menu
The bar across the top of the workspace is mission control. From left to right: the app name and your current project, the binder toggle, the view switcher, your session progress, the sprint timer, sharing and export actions, and the help, theme, and account menus.

- Binder toggle — the small panel icon hides or shows the binder to give your writing more horizontal space.
- View switcher — six ways to look at your project:
- Editor — a single plain editor. Clicking it closes every other view.
- Split — two panes side by side (see Split Editor).
- Corkboard — index cards for a chapter or folder. It stays greyed out until a pane is showing a chapter or folder (see The Corkboard).
- Map — your cast as a web of relationships (see Relationship Map).
- Plot — every plot thread across every chapter (see The Plot Board).
- Outline — the manuscript as one editable table (see The Outline).
- Session pill — shows words written this session against your session goal, with a tiny progress bar. Click it for a fuller picture and an Edit targets… shortcut (see Goals & Targets).
- Sprint — starts a timed writing sprint; the countdown ticks right in the bar (see Sprint Timer).
- Share and Compile — send chapters to beta readers or export your manuscript.
- ? Help menu — this documentation, What's New (a dot appears when there are updates you haven't seen), the keyboard shortcuts reference, and bug reporting.
- Theme button and account menu — cycle the look of the app, open your profile, or sign out.
On phones, these actions live in the ··· menu at the top-right, and the binder opens with the ☰ button. The menu's View group offers the same six views, with the corkboard called Board.
The Binder
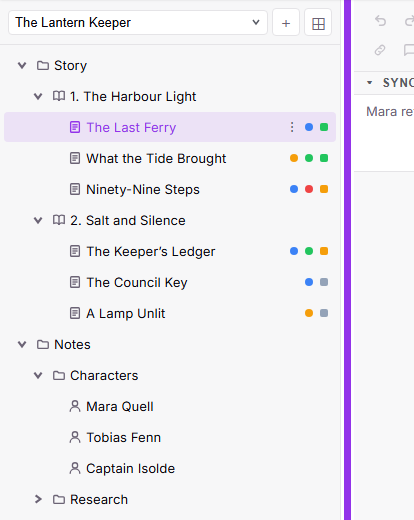
The binder is the left sidebar that holds your entire project as a tree of documents.
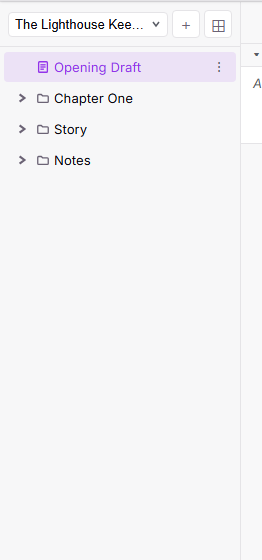
Document types
- Scene — a leaf document you write in. Holds rich text and counts words.
- Chapter — a container for scenes. Shown with an open-book icon. Use chapters to group the scenes that make up a narrative chapter.
- Folder — a generic container. Use folders to organise characters, research, or anything outside the story itself.
- Character — a character sheet, or a blank page if you prefer.
- Research — a research note sheet, or a blank page.
- Setting — a sheet for a place in your story, shown with a map-pin icon.
- Plot — a plot outline (beat sheet); each one is a thread on the Plot Board.
Characters, research, settings and plots are planning documents — see Planning Sheets and Plot Outlines.
Adding documents
- Right-click on any blank area of the binder to create a top-level document (New Scene, New Chapter, New Folder, etc.).
- Right-click on an existing chapter or folder to add a child document inside it (Add Scene, Add Chapter, Add Folder, etc.).
Renaming and deleting
- Double-click a document title to rename it inline. Press Enter to save or Esc to cancel.
- Right-click a document and choose Rename for the same effect.
- Right-click and choose Delete to remove a document and everything inside it. You'll be asked to confirm first, and the prompt tells you how many items go with it. Clearing out a lot at once? Turn Confirm before deleting off on your Profile page or in the ··· menu.
- Changed your mind? A message appears at the bottom of the screen right after you delete — click Undo and everything comes straight back. If it has already gone, look for 🗑 Trash at the foot of the binder: deleted documents wait there for 30 days, and the ⤴ button restores one along with everything that was inside it. After 30 days they are cleared out for good.
- Quick export — right-click any scene or sheet and choose Quick Export… to download just that document, without opening the full compile dialog.
- Quick share — right-click a scene, chapter or folder and choose Quick Share…. The Share window opens with just that document selected — or everything inside a chapter or folder.
Resizing the binder
- Drag the binder's right-hand edge to make it wider or narrower. Your width is remembered on that device. Double-click the edge to snap back to the default.
- From the keyboard: Tab to the edge, then ← / → to nudge it (hold Shift for bigger steps). Home and End jump to the narrowest and widest, and Enter restores the default.
- Titles that still don't fit show in full when you rest your pointer on them.
On a phone or tablet
- Tap ☰ at the top-left to open the binder. Tap the ✕ or the dimmed area beside it to close it.
- Every row has a ⋮ button that opens the same menu a right-click gives on a computer — Rename, Delete, Quick Share, and the rest.
- Tapping a scene or sheet opens it, so use ⋮ → Rename to rename one.
Drag & Drop
Every document in the binder is draggable. Click and hold any row, then drag it to a new position.
- Drop onto a chapter or folder to move the document inside it. The chapter or folder expands automatically.
- Drop between documents at the same level to reorder them. The order you set here is the order used during compilation.
- Corkboard cards are draggable too — reordering cards reorders the binder, and vice versa.
- On a touchscreen, press and hold a row until it lifts, then drag it. A quick swipe still scrolls the list.
The Editor & Toolbar
Select any scene, character, or research document to open it in the editor. The compact toolbar keeps every formatting tool on one row.

- Paragraph style — the first dropdown switches between Body text and Headings 1–3.
- Font — the second dropdown previews each typeface, including OpenDyslexic, a dyslexia-friendly option. The font applies to the whole document view.
- Text size — the − / + stepper changes the size of the selected text in points.
- B / I / U / S — bold, italic, underline, and strikethrough. The A and pen buttons open text-color and highlight swatches; the small bar under each shows the current choice.
- Lists, alignment, and indent — bullet and numbered lists, an alignment dropdown, and indent/outdent buttons that also nest and un-nest list items.
- Insert — the speech-bubble adds an annotation to the selected text; the grid inserts a table (row and column controls appear while your cursor is inside one); the quote marks toggle a blockquote.
- ⋯ More tools — superscript, subscript, clear formatting, line spacing, plus Version history, fullscreen (distraction-free) mode, print, and the keyboard shortcuts reference.
- Right cluster — the annotations panel toggle, a zoom stepper (the percentage resets zoom when clicked; zoom is view-only and never changes your export), the live word count with estimated reading time — plus the word and character count of the current selection — and the save-status pill.
Below the toolbar, the Synopsis bar holds a short summary that appears on the corkboard index card, and the Toolbar toggle collapses the formatting row when you want a barer page.
On a phone
- A slim toolbar sits just above the on-screen keyboard with bold, italic, underline, lists, quotes, undo and redo.
- The ↵ button starts a new line inside the same paragraph — for poetry, addresses and lyrics — which a phone keyboard can't do on its own.
- Tap Aa for the full formatting panel: headings, alignment, tables, checklists, plus Find, Quick jump and Version history. The ⌄ arrow at the right puts the keyboard away.
Inline Annotations
Annotations are margin notes attached to a passage of text — for revision reminders, research questions, or anything you want to tell your future self without touching the prose.
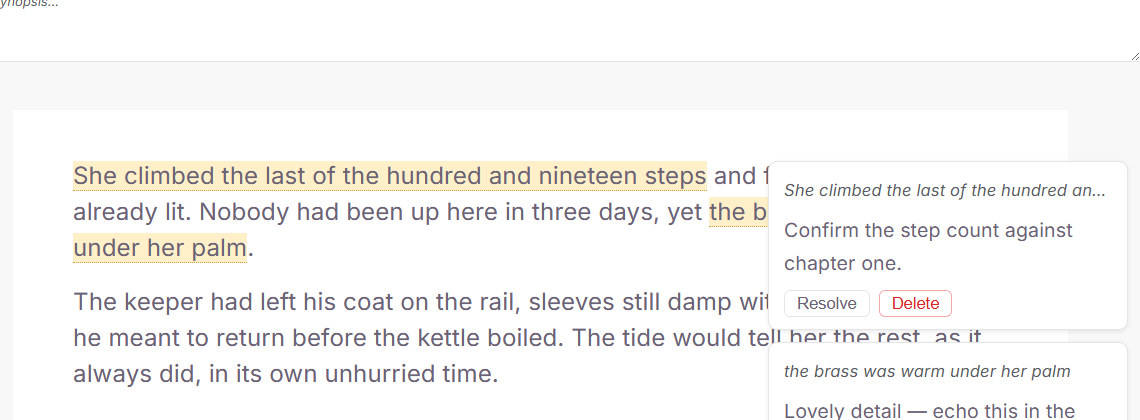
- Create — select some text and click the speech-bubble button in the toolbar. The annotated passage is tinted and a note card opens beside it, ready to type into.
- Edit — click a card's text to edit it in place. Notes save when you click away.
- Resolve — dims the note and its tint once it's handled; Unresolve brings it back. Delete asks before removing the note for good.
- Cards sit beside the exact line they annotate — in the margin on wide screens, in a slim panel otherwise. The 🗨 button in the top-right of the toolbar hides or shows them.
- Annotations never appear in exports or share links unless you explicitly opt in — see Compile & Export and Share with Beta Readers.
Version History
Insanitomeium quietly snapshots every document as you write, so an accidental deletion — or a rewrite you regret — is never permanent.
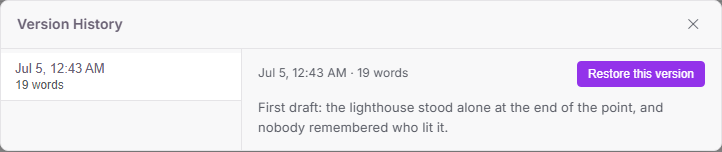
- Open the ⋯ menu at the right end of the toolbar and choose Version history.
- Click any snapshot to preview that draft's full text.
- Restore this version replaces the current text with the snapshot. Your current text is snapshotted first, so a restore is always reversible — and plain Ctrl+Z works too.
- Snapshots are captured automatically a few minutes apart while you write; identical saves are skipped. Recent versions are kept per document for a generous window, oldest pruned first.
Autosave & Sync
Changes are saved automatically as you type, a couple of seconds after your last keystroke. You never need to press a save button — the pill in the toolbar's corner shows Saving…, Saved, or Offline.
- If the live connection drops, the editor falls back to regular saving and shows Offline. It reconnects automatically.
- Opening the same project in two browser tabs keeps both in sync — edits in one tab appear in the other within seconds.
Split Editor
On desktop, click Split in the view switcher to open a second pane side by side — reference an outline while you draft, or compare two scenes.
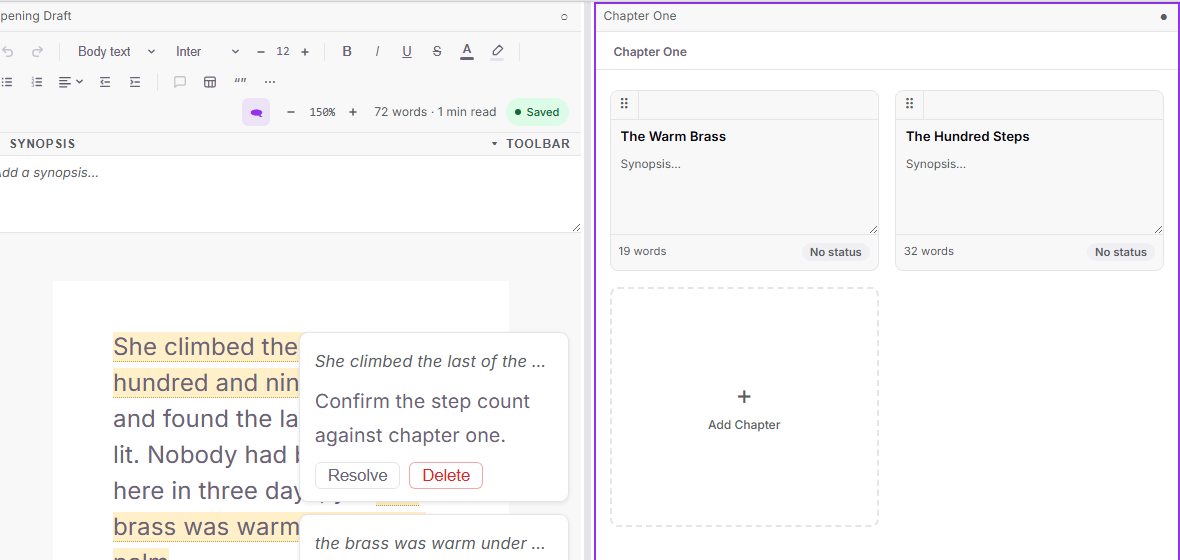
- Click a pane (or its ○ / ● target button) to focus it — the focused pane receives the next document you click in the binder.
- Drag the divider between the panes to resize them (from 20% to 80%). Double-click it to reset to an even split; with the divider focused, the arrow keys nudge it too.
- With corkboard view on, a pane holding a chapter or folder shows its corkboard while the other pane keeps your text — outline on one side, prose on the other.
- Click Editor in the view switcher (or Split again) to return to a single pane.
The Corkboard
With a chapter or folder selected in the binder, click Corkboard in the view switcher to see its children as index cards.
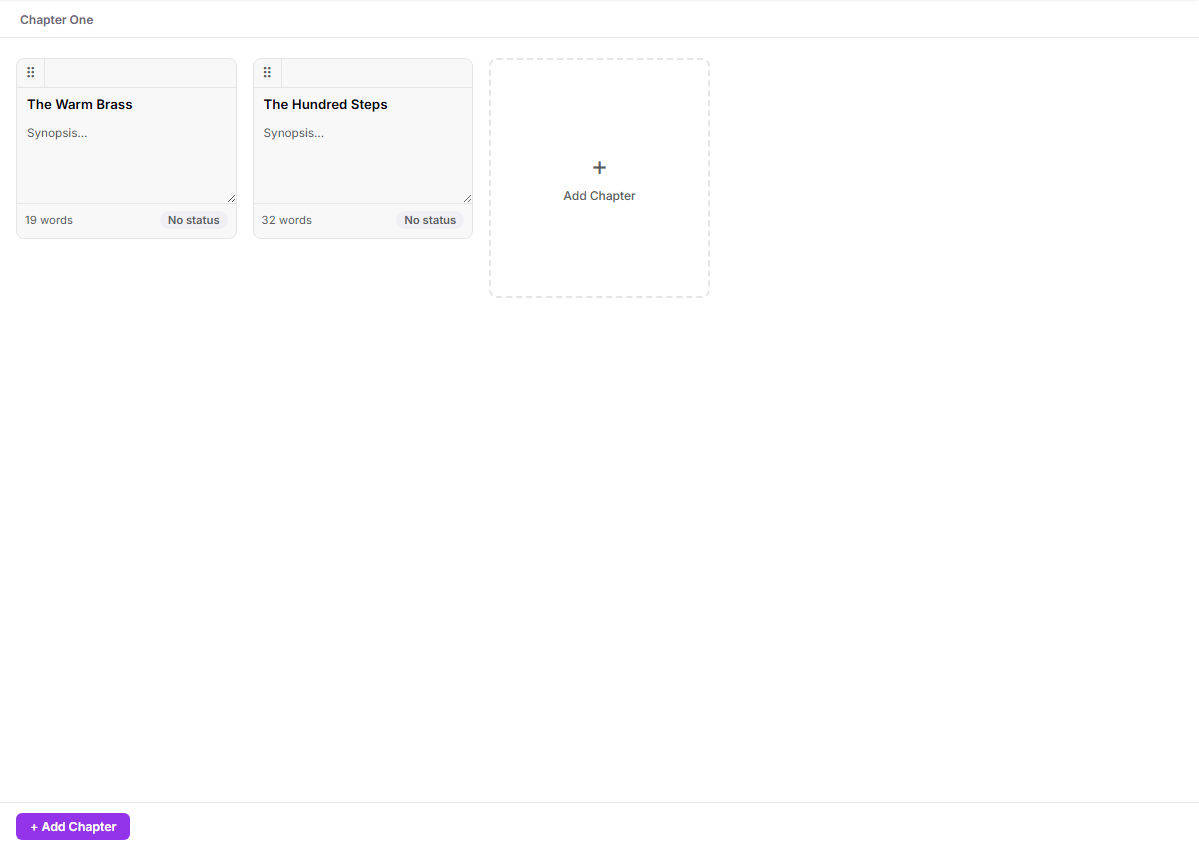
- Each card shows the document's title, synopsis, word count, label stripe, and status badge.
- Drag cards to reorder them — the new order is saved immediately and reflected in the binder.
- Edit a card's synopsis by clicking into the text area on the card.
- Click the label stripe or status badge to assign a label or status right on the card.
- Double-click a chapter or folder card to drill down into its own children; use the breadcrumb to climb back up.
- Click Editor in the view switcher to return to the text.
Labels & Statuses
Every document can carry any number of coloured labels (point of view, subplot, "needs edit", anything you like) and one status (how done it is).
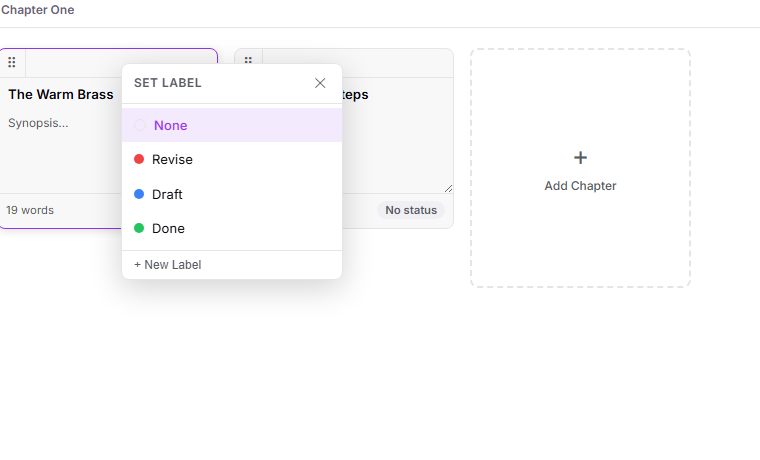
- Right-click a document and choose Set Labels… — or click a corkboard card's label stripe. The panel stays open, so you can tick several labels in one go; click a ticked label to remove it, or None to clear them all. + New Label creates one (name and colour).
- The first label you tick is the document's main label — the colour shown wherever only one fits. To change which comes first, untick the labels and tick them again in the order you want.
- The binder shows one dot per label, main label first. On the corkboard the card's stripe splits into one colour band per label.
- Set Status… (or the card's status badge) picks a single status; clicking the current one clears it.
- New projects come with three default statuses: Not Started, In Progress, and Complete. Rename, recolor, or delete statuses and labels under Document labels & statuses in the Project Manager (⊞). Deleting a label removes it from every document; if it was a document's main label, the next one steps up.
Planning Sheets
Characters, research notes, settings and plots are planning sheets: structured pages with a section for each thing you track, and nothing fixed — every field and section is yours to reshape.
Creating a sheet
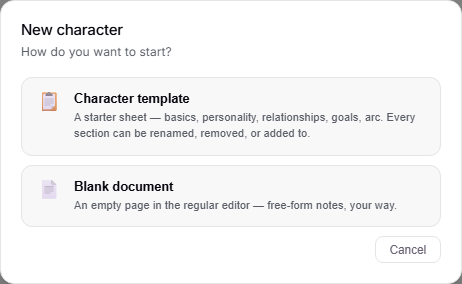
- In the binder, right-click a blank area and choose New Character, New Research, New Setting or New Plot — or right-click a folder and use the matching Add… entry to create it inside. On a chapter or folder's corkboard, the add card offers + Character, + Research, + Setting and + Plot.
- A window asks how you want to start: the template (a structured sheet — press Enter to pick it) or a Blank document, an ordinary page for free-form notes. The choice is made here, when the document is created.
What's on a sheet
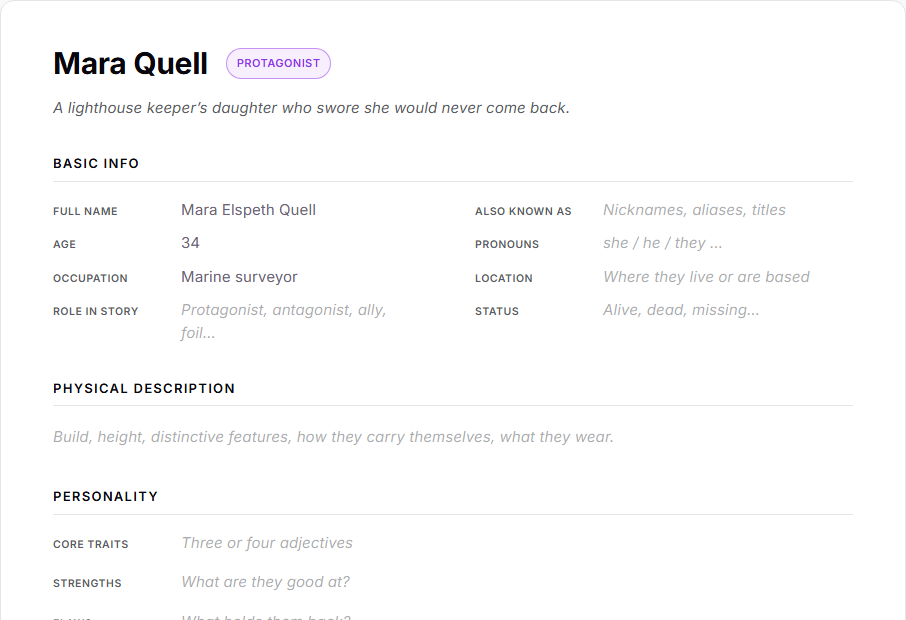
- Title — the document's name. Editing it renames the document in the binder too.
- The pill beside the title — Role for a character (Protagonist, Mentor, Villain…), Tag for research, Type for a setting (Building, City, Realm…), Structure for a plot. Pick a suggestion or type your own; whatever you type is kept.
- Tagline — the italic line under the title, for the whole thing in one sentence.
- Sections — a character starts with Basic Info, Physical Description, Personality, Voice & Mannerisms, Background, Relationships, Goals & Motivation, Conflicts, Character Arc and Notes; research with Summary, Key Facts, Sources, How This Applies to My Story and Open Questions; a setting with At a Glance, Sensory Details, Layout & Landmarks, History, Who's Here, Rules of the Place, Story Role and Scenes Set Here.
Editing
- Click any field and type. Sheets save automatically, like every other document, and their words count toward your totals.
- Select text for a small formatting bar — bold, italic, underline, strikethrough, and a bullet-list button in fields and free-text sections.Enter makes a real line break.
- Click a section title to rename it. Hover a section and click Remove to delete it — it goes straight away, with no confirmation, so check you have the right one. + Add section at the bottom adds a free-text section of your own.
- Lists have their own add buttons — + Add relationship, + Add fact, + Add source, + Add landmark and so on — and a ✕ on each row.
- A new sheet shows a Starter template notice at the top; click its ✕ once you no longer need it.
Linking characters
- In a character's Relationships section, start typing a name: a list of your other characters appears. Pick one to link the row to that character. Names you don't link still work — they appear on the map as a character with no sheet yet.
- The coloured chip at the end of a row sets the relationship's type — Family, Romance, Ally, Rival, Enemy or Other — and its strength, one to three dots. These draw the Relationship Map.
Exporting sheets
- Right-click a sheet and choose Quick Export…, or include it in a compile. Sheets come out as formatted headings and text; empty fields and hints are left out.
- The Project Manager's ZIP export has an Include relationship types option that adds each relationship's type and strength, such as "(Romance, 2/3)".
Plot Outlines
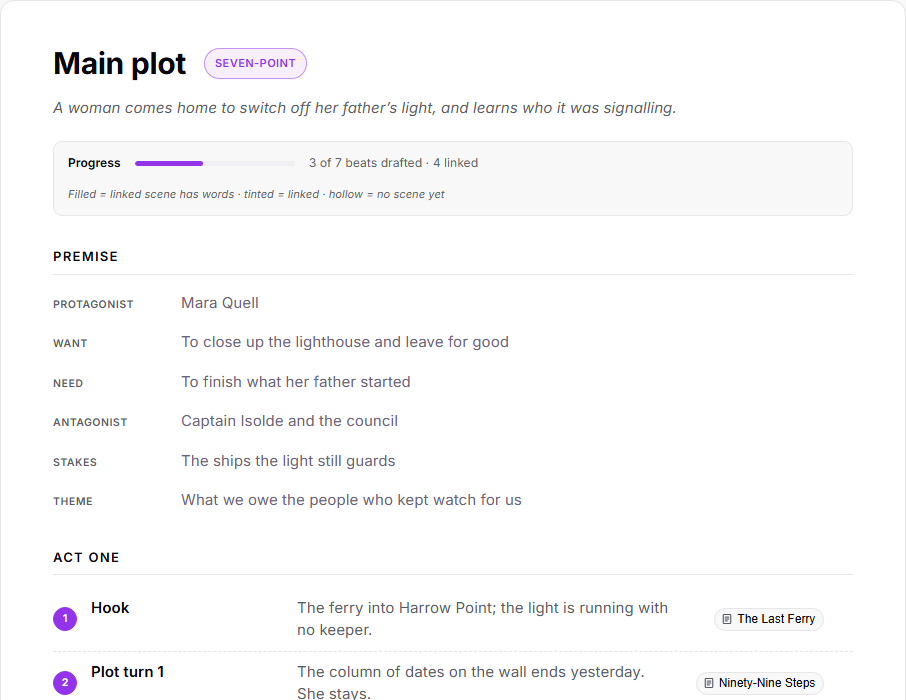
A plot outline is a beat sheet: a premise, then acts made of beats, each beat saying what happens and what changes. Create one with New Plot or Add Plot in the binder and pick the Beat sheet template (or a blank page to plan in prose). Each plot outline is one thread — make one for the main plot and one for each subplot.
Laying it out
- Premise — Protagonist, Want, Need, Antagonist, Stakes and Theme.
- Acts — a new outline has three: Act One — Setup, Act Two — Confrontation and Act Three — Resolution. Each beat is a row: its name on the left, what happens on the right. + Add beat adds another, and the ✕ on a row removes it.
- Subplots and Notes follow the acts.
Choosing a structure
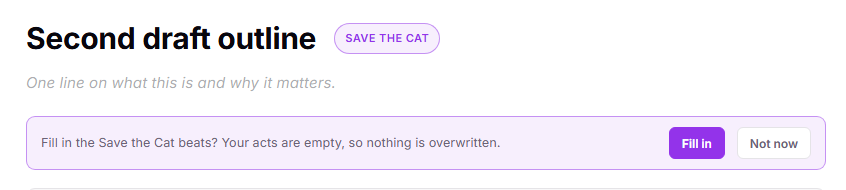
- Click the Structure pill beside the title and pick Three-act, Save the Cat, Hero's Journey, Five-act, Seven-point, Kishōtenketsu, Freytag or Custom.
- While your acts are still empty, a bar offers to Fill in that structure's beats — every act laid out and every beat named, ready for you to write what happens. Choose Not now to keep them empty. The offer disappears as soon as any beat has text, so it can never overwrite your work.
Linking beats to scenes
- Click + Link scene on a beat and search for the scene where it happens. The chip then shows the scene's title; click it for Open scene or Unlink. Deleting a scene just unlinks the beat — the beat is kept.
- Each beat's number shows its progress: hollow means no scene yet, tinted means linked, and filled means the linked scene has words in it. The Progress line at the top counts them up — "4 of 15 beats drafted · 6 linked".
- Your beats are one record shown three ways: here, as cards on the Plot Board, and as thread chips in the Outline. A change in any of them shows in the others.
The Plot Board
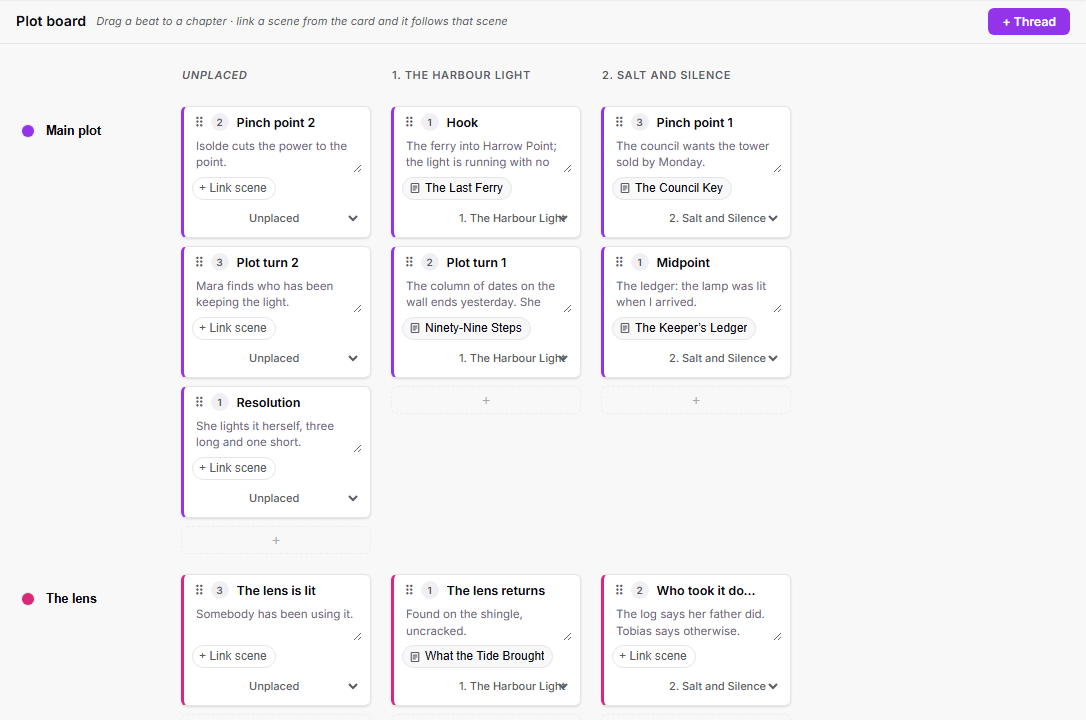
Click Plot in the view switcher to see every plot thread across every chapter: one row per plot outline, one column per chapter, and each beat as a card. Beats that aren't in a chapter yet wait in the Unplaced column at the left.
Threads
- + Thread starts a new subplot: it creates a plot outline called "New thread" in your binder with its name ready to type.
- Click the coloured dot at the start of a row to change the thread's colour.
- Click a thread's name to open its beat sheet.
Beat cards
- Drag a card by its ⠿ grip into a chapter column, or pick a chapter from the drop-down on the card. Cards move within their own thread's row.
- Click the + in any cell to add a beat to that thread in that chapter. Card titles and summaries are editable in place; the ✕ removes a beat.
- + Link scene on a card links it to the scene where the beat is written, and the card moves to that scene's chapter.
- Moving a linked card to a chapter that doesn't contain its scene unlinks it — the board never moves your scenes. Moving a card back to Unplaced clears both its chapter and its link.
On a phone, the board shows one chapter at a time — tap the chapter chips along the top to move between them. Use the drop-down on a card to move it, and + Beat under a thread to add one.
No rows yet? The board fills up as soon as you have a plot outline — click + Thread, or create one from the binder.
The Outline
Click Outline in the view switcher to see the manuscript as one table — every chapter and scene in binder order, with the total scene and word count at the top. Everything in it can be edited in place, so you can rework the shape of a book without opening a scene.
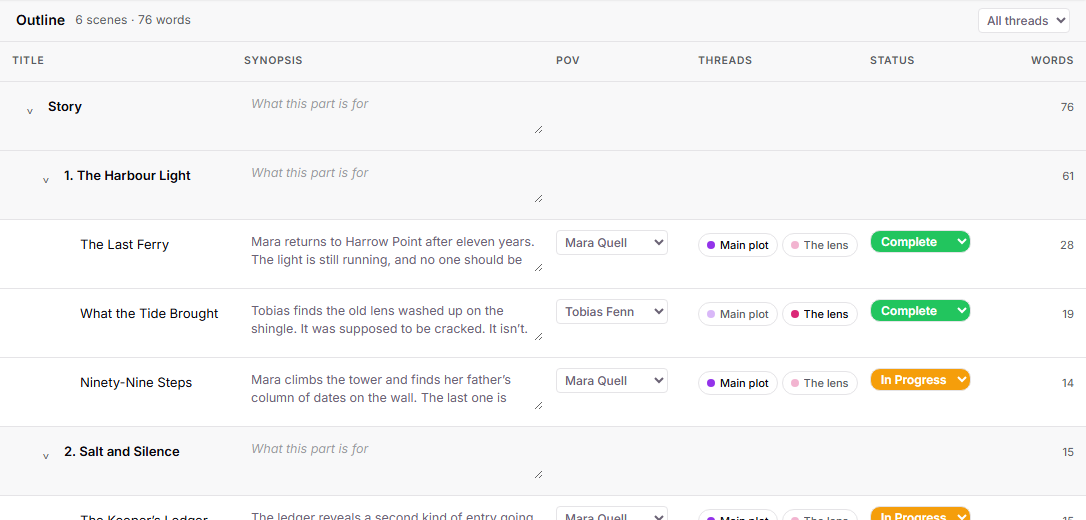
- Title — click to open the document. The arrow beside a chapter or folder folds it away.
- Synopsis — click and type; it saves when you click away. It's the same synopsis shown on the scene's corkboard card.
- POV — pick the point-of-view character from your character documents.
- Threads — one chip per plot thread. Click a chip to put the scene on that thread: the plot outline gains a beat linked to the scene. Click it again to take the scene off, which removes the beats linked to it.
- Status — the same status you set from the binder, shown in its colour.
- Words — a chapter's count is the total of everything inside it.
- Use All threads in the header to show only the scenes on one thread.
Only the manuscript is listed — character, research, setting and plot documents stay out of it. On a phone, or in a narrow split pane, each row becomes a card with the same fields.
Relationship Map
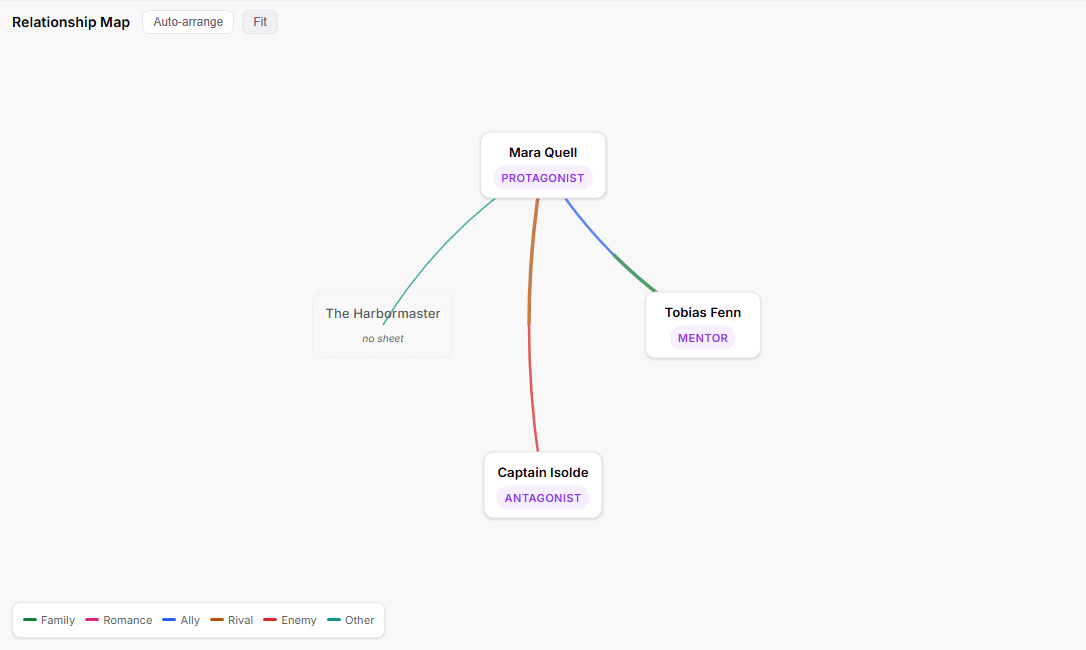
Click Map in the view switcher to see your whole cast as a web. Every character document is a card, and the relationships on their sheets are the lines between them.
Reading the map
- A line's colour is the relationship type (the legend along the bottom) and its thickness is the strength.
- When two characters see each other differently — he calls her a friend, she calls him a rival — the line splits in the middle, each half in its own side's colour.
- Two characters can have more than one relationship at once — rivals and lovers, say. The line then fans out into one arc per type.
- A dashed card is someone named in a relationship who has no character document yet. Click it and choose Create character sheet to make one; the lines reconnect to it, and the new sheet starts with those relationships already filled in.
Building relationships on the map
- Hover a card and drag the small handle at its edge onto another card. Both characters' sheets get the row, and the relationship editor opens with each character's view of it — type and strength.
- The editor has a tab for every relationship between the two characters, plus + New. Dragging between two characters who are already connected opens it on + New: pick a type to add another relationship, or switch tabs to change an existing one.
- Drag the handle onto an empty part of the map to create a new character there. Type a name and they get a character sheet, already linked to the character you dragged from. If the name belongs to someone already on the map, the line goes to them instead.
- Click, tap or right-click any line to open the editor on the relationship that line shows. From a character's panel, pick the other name and choose Edit relationships.
- Remove this relationship takes it off both characters after you confirm — including anything written about it on their sheets.
- This works for characters written as blank pages too: their relationships are stored with the project and the page itself is left exactly as you wrote it.
- The map sets types and strengths; write the description of a relationship on the character's sheet (see Linking characters).
Moving around
- Drag cards to arrange the web — the layout is saved and follows you to other devices. Drag the background to pan; scroll or pinch to zoom.
- Auto-arrange puts every card back in a circle; Fit zooms to show everyone.
- Click a card for a side panel listing its relationships; double-click to open the character's sheet. Click a line to see what each character says about the other.
Goals & Targets
The session pill in the top menu keeps your daily goal in view while you write: words written this session, your session goal, and a progress bar.
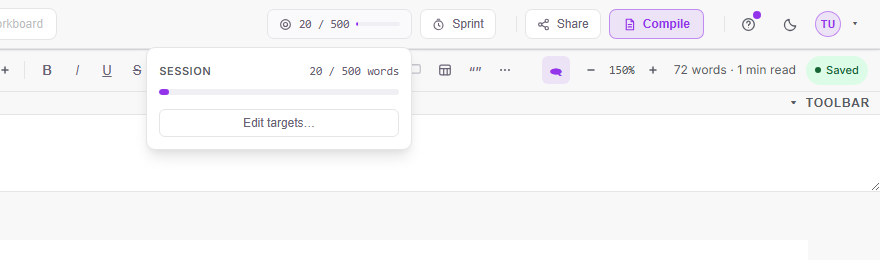
- Click the pill for the popover: session progress, your overall draft progress against the project's word target, and Edit targets…, which opens the full targets panel.
- In the targets panel, set your session goal inline, and use Set goal → to give the project a total word target and optional deadline — the panel then shows the daily pace needed to finish on time.
- Session progress resets at midnight; your writing history is tracked on your Profile page.
Your profile page
Open it from the account menu (top-right). It gathers your writing history and your account-wide settings:
- Yearly stats — words written, writing days, your current and best streak, and typing speed. The arrows beside the year step back through earlier years.
- Writing Activity — a heatmap of the last 12 months — and Writing Pace, a bar for each of the last 30 days.
- Preferences — Confirm before deleting (the prompt before a binder delete) and Don't count pasted text as progress, which keeps pasted words out of your session, sprint, pace and yearly counts. Your streak is never shortened by it.
- Manuscript Info — legal name, pen name, address, phone and email for the title page of a Manuscript export.
Sprint Timer
Sprints are short, focused writing bursts against the clock. Click Sprint in the top menu to open the timer.

- Pick a duration preset (or type your own), optionally set a word goal for the sprint, and press Start.
- The countdown ticks right in the Sprint button, so you can hide the panel and just write. Words written during the sprint are counted live.
- Pause, resume, or reset any time; a chime sounds when time is up and the panel reopens with your sprint word count.
Share with Beta Readers
Send chapters to readers as a clean, read-only web link — no account needed on their end, no attachments, and your project stays private.
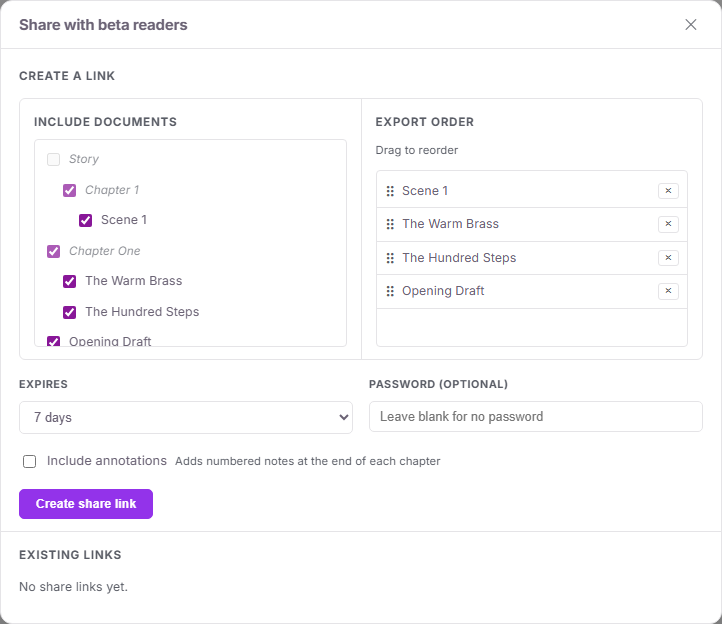
- Click Share in the top menu, tick the chapters and scenes to include, and reorder them if needed — the link shows a snapshot of your text as it is right now.
- Choose an expiry (7, 30, 90 days, or never) and an optional password.
- Tick Include annotations to add your margin notes as numbered endnotes at the end of each chapter. Off by default — your notes stay private unless you choose otherwise.
- Copy the link immediately — for security it is shown only once. The manage list shows each link's views and lets you revoke it at any time.
- Readers get a comfortable chapter-by-chapter reading page with a contents menu — nothing to install.
- Readers pick a reading theme — Auto, Light, Dark or Tome — at the bottom of any page. Auto follows their own device's dark mode.
- To share one scene or chapter quickly, right-click it in the binder and choose Quick Share… — the window opens with just that selected.
Compile & Export
Click Compile in the top menu to turn your selected scenes into a finished file.
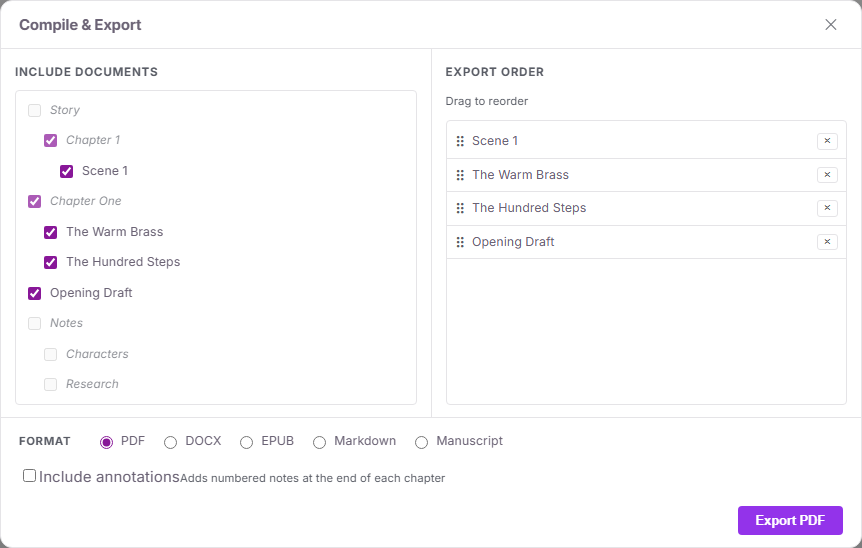
- The binder tree is shown with checkboxes — check the scenes to include. Drag scenes within the export list to change their order without affecting the binder.
- Choose an output format:
- PDF — print-ready PDF.
- DOCX — Microsoft Word document.
- RTF — rich text that Pages, Word, TextEdit and LibreOffice all open with your formatting kept. The best choice for Pages on an iPad.
- ePub — e-reader format; scenes under a chapter are merged into one book chapter.
- Markdown — plain Markdown text file.
- Manuscript — standard manuscript format DOCX with title page, running header, and double-spaced 12pt Courier. Author info is set on your Profile page.
- Include annotations renders your margin notes as numbered endnotes after each chapter (not available for Manuscript, which follows strict submission formatting).
- Need everything at once? The Project Manager's ⬇ ZIP button downloads the whole project as a ZIP that mirrors your binder folders, with each document as TXT, RTF, or DOCX.
Quick Document Jump
Press Ctrl+G anywhere in the app to open the Quick Jump panel.
- Start typing any part of a document title — matching results appear instantly as you type.
- Press ↑ / ↓ to move through results, then Enter to open the highlighted document.
- Click any result to open it directly.
- Press Esc to dismiss the panel without navigating.
Find & Replace
Press Ctrl+H to open the Find & Replace panel. Unlike a single-document search, this searches every document in the active project at once.
- Type a search term and press Enter or click Search. Results are grouped by document, each showing a short context snippet with the matched term highlighted.
- Click any context snippet to navigate directly to that document.
- Two search options are available:
- Case sensitive — when off (the default), "the" matches "The" and "THE". Turn it on to match exact capitalisation only.
- Whole word — when on, "cast" will not match inside "broadcast".
- Replace in doc — the button beside each document replaces all matches in that document only, then re-runs the search.
- Replace All — replaces all matches across every matched document. A progress indicator shows Replacing… N / N while it works.
- Leave the Replace field empty to delete all occurrences of the search term.
Themes & Appearance
The theme button in the top menu cycles through three looks — the icon always previews where the next click takes you.
- Light — the clean default.
- Dark — easy on the eyes for night writing.
- Tome — ink, parchment, and gold, for when the manuscript deserves a grimoire.
- Your choice is saved to your account and follows you across devices.
- Independent of the theme, the editor offers per-document fonts, text size, line spacing, and a view-only zoom — see The Editor & Toolbar.
Updates & Feedback
- What's New — a dot on the ? Help button means something shipped since your last visit. The News & Updates page explains every release in plain English, with how-to guides.
- Give feedback — on a computer it's in both the ? Help menu and your account menu; on a phone it's in the ··· menu. Choose whether it's a bug, feedback, or something else, describe it, and attach up to three screenshots; images are automatically scrubbed of hidden photo data before they leave your browser, and the report shows you exactly what it includes before you send it.
Keyboard Shortcuts
The full list is also available inside the app — open the ? Help menu and choose Keyboard shortcuts.
| Ctrl+B | Bold |
| Ctrl+I | Italic |
| Ctrl+U | Underline |
| Ctrl+Shift+X | Strikethrough |
| Ctrl+. | Superscript |
| Ctrl+, | Subscript |
| Ctrl+Alt+0 | Body text |
| Ctrl+Alt+1 | Heading 1 |
| Ctrl+Alt+2 | Heading 2 |
| Ctrl+Alt+3 | Heading 3 |
| Ctrl+Alt+4 | Heading 4 |
| Ctrl+Alt+5 | Heading 5 |
| Ctrl+Alt+6 | Heading 6 |
| Ctrl+Shift+8 | Bullet list |
| Ctrl+Shift+7 | Numbered list |
| Ctrl+Shift+9 | Checklist |
| Ctrl+Shift+B | Blockquote |
| Ctrl+K | Insert / edit link |
| Ctrl+Z | Undo |
| Ctrl+Shift+Z or Ctrl+Y | Redo |
| Ctrl+G | Quick document jump |
| Ctrl+H | Find & replace |
| Esc | Exit fullscreen |